I have a few more tips on getting the most from your sessions by having a streamlined and effective workflow.
If you haven’t read the first part, it would be a good idea to stop here, go back and have a look at the previous post discussing templates.
But if you’re the type that doesn’t read the book but reads the synopsis on Wikipedia then here’s what you missed.
For modern composers, being a good composer is no longer enough to compete in this game. You need to have a multitude of skills ranging from composing to orchestration to sequencing (synthestration) and mixing. Often on smaller projects, you might even be doing the mastering.
Organization is a powerful tool to optimise workflow allowing for more streamlined and effective output.
One of the most utilized methods of organization in today’s world is templates (although I have some interesting thoughts on this… go back to the first post to find out more).
There are many other ways to optimise productivity through effective organization and each of us tends to incorporate these into our workflow as we begin to progress over time.
But for now, let's go a little deeper into the organization within templates and discover how to get the most out of what they can offer.
The concepts I’d like to discuss with you today are:
1) Grouping
2) Kontakt Instances - making it easy to save groups of tracks
3) Buses - keeping your orchestral template organized
4) Stems - making it easy to export groups of tracks for mixing
Let’s take a look at why you should start incorporating grouping into your workflow.
Groups
Composing, like any other labor, has to be both organized and efficient. There has to be space for spontaneity and a bit of messiness, of course, but the more organized your system is the more productive your time will be.
Grouping stuff will serve many purposes. There are many ways you can organize tracks -- we will be discussing different approaches depending on our needs in a minute -- but right away these are some of the benefits:
First, it will give you quick control over groups of instruments. You may want to solo all the small percussion tracks to check on their width and L/R balance. Or you may need to isolate the low short brass and low percussion. In a big project with lots of tracks, it will take some time to solo individual tracks. But if you set up some buses, or if you have some track folders, it will be faster to just solo those buses or folders.
Another way of grouping is saving groups of tracks that you can load later, like saving Kontakt instances, or using the “Load track template” feature in Sonar (discontinued). Not only will you save time loading tracks, but you can also save the tracks premixed and pre-routed, so when you load them it already sounds good, and you are not dealing with problems right away.
Finally, working with groups may help you when you are exporting stems.
So you see how effective organization can benefit your creative process? Grouping is a fantastic way to get great results FAST!
KONTAKT INSTANCES: making it easy to save groups of tracks
I like saving Kontakt instances.
It is important to save the work you have done, so you can reuse part of what you have built for future projects. If I composed a cue and I spent some time setting up some African percussion instruments, I will make sure to save it afterwards as an organized Kontakt instance. I will do the same for tuned percussion or for short/long fixed decay instruments.
The idea is to have as many Kontakt instances saved as possible so when you later need to load a group of instruments, you have a palette of instances that you can use.
At this point, you may think: “don’t I have a template so I already have these tracks loaded?”. Go back to the
templates post and read the Modular Template section.
Back to Kontakt instances… For example, let’s say you need some wood tuned percussion. You’d load this instance:

It is a set of 16 instruments. You may not use all of them, but you’d have them available quickly and easily. This frees you to concentrate on composing, not on technical, computer-related aspects of your project.
Remember that it usually doesn’t matter these days if you are loading more than you need. In most cases, you won’t run out of RAM before your CPU is maxed out. It also helps if these sets are then routed or bused out to auxiliary tracks that can be used to add automation or reverb... But I’m getting ahead of myself.
Back to Kontakt.
You can organize instruments by range, by envelope (plucked, sustained), by style (low epic percussion, barbaric drums), by orchestral family, by projects (you are writing a sequel and need to create the same sonic landscape), by tone color, etc. It is up to you, but have as many saved instances as you can. And make sure to save new instances every time you finish a project. Name them in a way that makes sense to you, so you can easily find them later.
As I was saying before, in similar fashion to groups, buses can prove extremely effective in getting a fluid workflow across all your projects.
Want to get right to it? So do I.
BUSES: keeping your orchestral template organized
I like using buses, and I route all my tracks to specific buses.
I have a basic set of 16 buses. This basic set is useful for three reasons.
- It allows me to listen to specific sections (high short strings, synths, etc).
- It gives me control over those specific sections. If I need more low brass in a specific part of the cue, I will automate that bus. That is more efficient than doing so in each low brass instrument track, and it ensures that I am keeping the balance intact for that section.
- And most important, it allows me to export stems quickly.
Most sequencers will allow you to export the buses when you bounce your mix
I will usually have these sixteen buses:
- Strings Short High
- Strings Short Low
- Strings Long High
- Strings Long Low
- Brass Short
- Brass Long
- WW Short
- WW Long
- Synths 1
- Synths 2
- Piano
- Aux
- Perc High
- Perc Mid
- Perc Low
- Others

Why do I choose to have those specific buses? This is a bit of a long explanation, so bear with me...
Mixing for many composers is a separate step than composing. I like to keep the mixing separate from composing. You can do a bit of mixing while you are composing, but at some point, you will need to separate the processes to gain some clarity.
I mix in a separate project, so at some point, I will need to export my tracks and import them into a new blank audio project. When I do so, I will rarely export every individual track. Instead, I will group the tracks into stems and then export a reduced number of stems, which can range from a few of them to as many as 30-40.
When exporting stems, I like separating high and low, short and long, and instrument families.
You can have as many buses as you want, and the number of buses may change from project to project. Make sure you are organizing them in a way that makes sense to you so you will have flexibility when mixing.
The final reason for the organization of buses is that it will help you switch from composing to mixing and ensure a smooth transition from one to the other. That leads us on to “Stems”.
Before jumping to the next section… There are some more organization steps that you can take to set up your sequencer if you are scoring a film (i.e. setting up the markers section, video, temp track, tempo… setting up key-commands to switch different views, etc). In this chapter though, we’re just covering the basic organization techniques that you wanna use when you’re composing orchestral music with your sequencer.
Alright, then! Next step… Stems.
STEMS: making it easy to export groups of tracks for mixing
As I said before, I use stems, not individual tracks, for mixing. A stem is a group of tracks that are bounced together into one audio output file.
The buses you set up earlier will facilitate creating stems afterwards. In most sequencers, when you select File/Export/Audio, just select Buses as the source and separate stereo or 5.1 audio files of the buses you created will be made.
Another way to export stems is to select (or solo) the tracks that you want for every stem. This method takes a bit longer, and you may miss exporting some tracks. I recommend using a spreadsheet to make sure you export everything. It’s a bit old-school, but it works. You don’t want to open the new mixing project and find out that you forgot one track.
Here is an example of a not-so-big cue with 38 tracks and 18 stems.
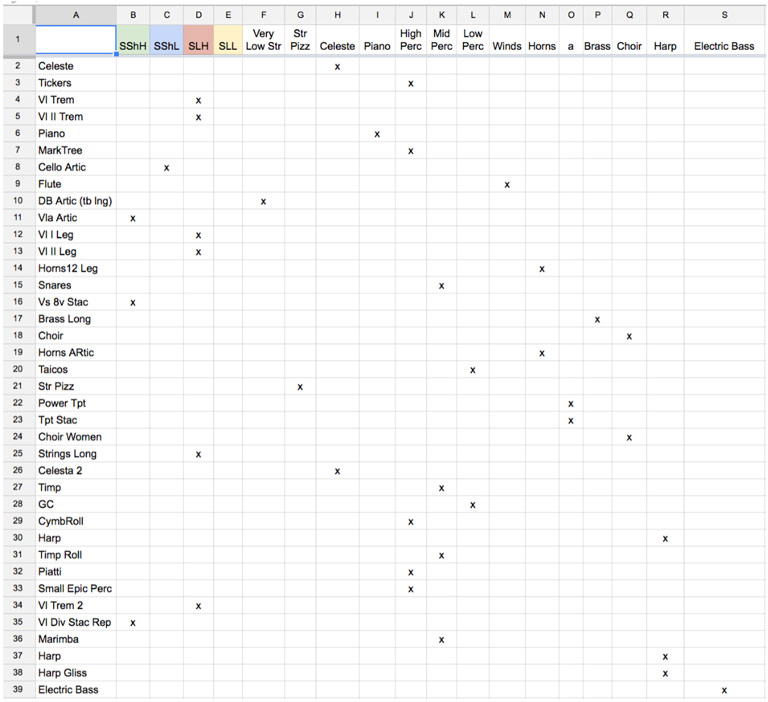
Again, decide which and how many stems you want to export. Make sure there are not so many that the mixing process will be complex, or so few that you will not have enough flexibility.
All this prep work will be extremely beneficial down the line when it comes to composing and arranging. If everything is organized before starting composing, you will see your template acting as your score paper where you can clearly see each instrument and what it is doing at any point in the piece.
In the
next post we’ll dive into Arranging.
If organization is key to be efficient, a good arrangement is the single most important thing when it comes to defining the final sound of the piece.
A good mix and mastering are important steps. But the arrangement plays a much major role in defining how good your mockup will sound. More importantly, it is vital to get the arrangement right because you won’t be able to fix any arranging mistakes later on in the mixing or mastering.
But we’ll get into that in the next post. Keep an eye out for that one.


